


Your Hidden Muscle Group: The Key to Better Bladder Control with BPH
When you think of pelvic floor muscles, you might think “women’s health.” But here’s the truth every man with BPH needs to know: Your pelvic floor is the unsung hero of urinary control. When weakened or dysfunctional—often due to age, straining with BPH, or even chronic sitting—these muscles contribute to dribbling, urgency, and incomplete emptying.
The good news? Like any muscle, your pelvic floor can be strengthened and retrained. This step-by-step guide cuts through the confusion, teaching you exactly how to perform pelvic floor exercises (often called Kegels) correctly for BPH symptom relief. Done properly, these exercises can help reduce post-void dribbling, improve emptying, and even ease urgency.
Understanding Your Pelvic Floor: It’s Not Just About “Stopping the Flow”
Anatomy 101: What You’re Strengthening
Your pelvic floor is a hammock-like sling of muscles that stretches from your pubic bone to your tailbone. It supports your bladder, rectum, and yes, your prostate. For urinary function, two key actions matter:
- Contraction (Kegel): Lifts and tightens to maintain continence.
- Relaxation & Lengthening: Crucial for complete bladder emptying—a part most men miss!
With BPH, you often have a paradox: The muscles may be weak (causing dribbling) but also chronically tight and unable to fully relax (contributing to poor emptying). Your exercise program must address both strength and flexibility.
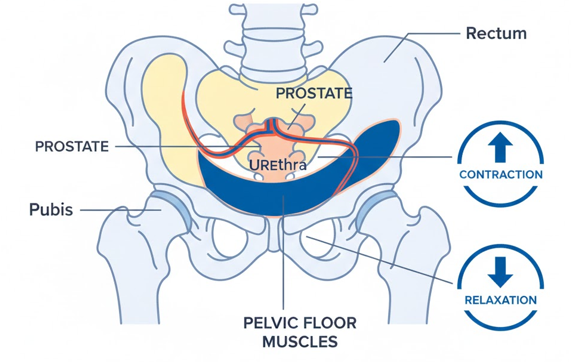
Side view diagram of male pelvic anatomy showing bladder, prostate, and pelvic floor muscle sling with contraction/relaxation arrows.
Step 1: Finding Your Pelvic Floor Muscles (The Right Way)
Avoid the “Stop-Mid-Stream” Test. While commonly suggested, regularly stopping your urine flow can actually disrupt bladder emptying and is not a recommended training method. Use these safer techniques instead:
- The Sitting Identification:
- Sit on a firm chair.
- Imagine trying to lift your testicles up and inward toward your body without moving your legs, buttocks, or abdomen. You should feel a gentle lifting and tightening around the base of your penis and anus.
- Place a hand on your lower abdomen—it should stay soft. If you feel your belly bulging, you’re using the wrong muscles.
- The Visualization Technique:
- Imagine you’re trying to prevent passing gas in a quiet room. The gentle clench you’d use is your pelvic floor contracting.
- Now imagine you’re urinating and want to let the last few drops out. The feeling of “letting go” is your pelvic floor relaxing.
What You Should NOT Feel: Buttocks squeezing, thighs tightening, breath holding, or abdominal pushing. If you feel these, you’re recruiting the wrong muscle groups.
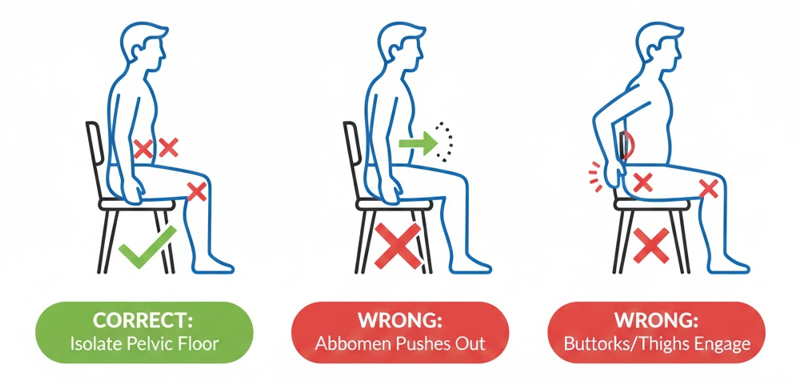
Correct vs. Incorrect muscle engagement for pelvic floor exercises
Step 2: The BPH-Tailored Exercise Protocol
This program balances strength, endurance, and relaxation. Perform it daily.
Phase A: The Foundation (Weeks 1-2)
Goal: Master the isolated contraction and relaxation.
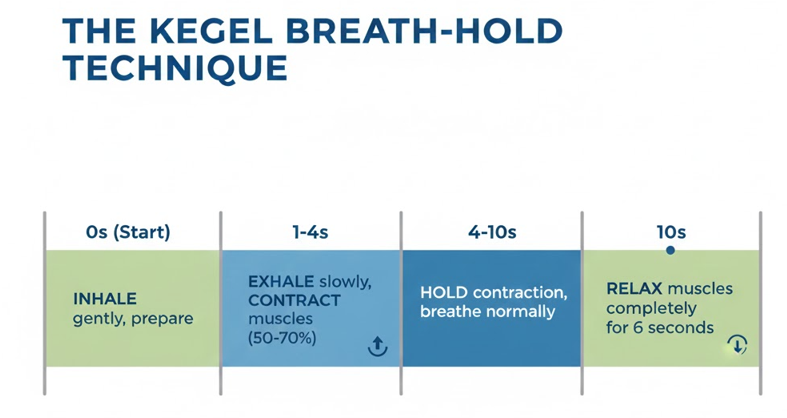
- Exercise 1: Slow Contractions
- Contract your pelvic floor muscles slowly to a maximum of 50-70% strength (not a full, straining clench).
- Hold for 3 seconds.
- Completely relax for 6 seconds (focus on the “letting go” feeling).
- Repeat 10 times. This is 1 set. Do 2-3 sets per day.
Phase B: Building Endurance & Quick Reflexes (Weeks 3-4)
Goal: Prepare muscles for real-life situations like a sudden cough or urgency.
- Exercise 2: Quick Flicks
- Contract and release the muscles as quickly as possible.
- Aim for 10-15 quick flicks. Rest 10 seconds.
- Repeat 3 times. Do 1-2 times daily.
- Exercise 3: Long Holds
- Contract to 50-70% strength and hold for up to 10 seconds (only if you can do so without straining).
- Relax fully for 15 seconds.
- Repeat 5 times. Do once daily.
Phase C: Functional Integration (Weeks 5+)
Goal: Apply strength during daily activities.
- Practice “The Knack”: Gently pre-contract your pelvic floor just before any action that increases abdominal pressure: coughing, sneezing, lifting, standing up from a chair. This prevents stress leakage.
- Focus on Relaxation: After urinating, take 3 deep breaths, consciously relaxing your pelvic floor to encourage complete emptying.

Common Mistakes & How to Avoid Them
- Mistake: Over-Training or Straining.
- Sign: Fatigue, increased pelvic discomfort, or worsening symptoms.
- Fix: Never exercise to exhaustion. “Less is more” initially. Stick to the recommended sets.
- Mistake: Holding Your Breath.
- Sign: You turn red or feel lightheaded.
- Fix: Breathe normally throughout. Inhale as you prepare, exhale gently during the contraction if it helps.
- Mistake: Failing to Fully Relax.
- Sign: A constant, vague tension in the pelvis.
- Fix: Spend double the time on relaxation as on contraction. The “relaxation phase” is therapeutic.
- Mistake: Expecting Overnight Results.
- Fix: Commit to 6-8 weeks of consistent practice before expecting noticeable changes in dribbling or urgency.
When to Expect Results & How to Track Progress
- 4 Weeks: You’ll likely have better muscle awareness and control during the exercises.
- 6-8 Weeks: You may notice a reduction in post-void dribbling and slightly improved urgency control.
- 12 Weeks: More consistent improvement in symptoms, especially if combined with other strategies like bladder retraining.
Track Your Progress: Use a simple calendar to mark your daily practice. Note any changes in your BPH symptom score.
Special Considerations & When to See a Professional
- If You Have Pain: Stop. Pain during or after exercises is not normal and may indicate you’re using the wrong muscles, have overly tight muscles, or have a condition like prostatitis. Consult a pelvic floor physical therapist.
- If You See No Improvement After 8 Weeks: You may have a coordination issue or muscle imbalance that requires professional guidance. A specialist can provide biofeedback or manual therapy.
- Post-Prostate Surgery: These exercises are crucial for recovery but timing is key. Follow your surgeon’s specific protocol.
Tools & Resources to Enhance Your Training
While not necessary, some tools can provide valuable feedback:
- Biofeedback Devices: Wearable sensors (like the Elvie Trainer or Perifit) connect to a smartphone app to show if you’re contracting correctly. Excellent for beginners who struggle with isolation.
- Pelvic Floor Physical Therapists: The gold standard for personalized care, especially for complex cases or pain. They can perform internal and external assessment and treatment.
Conclusion: Consistency Beats Intensity
Strengthening your pelvic floor is a marathon, not a sprint. Five minutes of correct practice daily is far more effective than an hour of strained, incorrect effort once a week. By integrating these exercises into your routine—perhaps while brushing your teeth or during a commercial break—you’re taking a powerful, proactive step toward managing your BPH symptoms from the inside out.
Your Action Plan:
- Spend 3 days just identifying the muscles without formal exercises.
- Begin Phase A and commit to 2 sets daily for 2 weeks.
- Be patient and focus on quality of movement, not quantity.
- Combine with other strategies like your anti-inflammatory diet for comprehensive management.
Navigate Our Complete BPH Hub:
- Silo 1: BPH Symptoms & Daily Management
- Silo 2: Medical & Surgical Treatments
- Silo 3: Natural Remedies & Lifestyle (You are here)
- Main Hub: The Complete Guide to BPH & Prostate Health
FAQs
1. How are pelvic floor exercises for BPH different from those for women?
The muscles are the same, but the goals and focus differ. For BPH, there’s a greater emphasis on: 1) Learning to fully relax the muscles to aid bladder emptying, not just contracting. 2) Improving coordination to prevent leakage during activities that increase abdominal pressure (like straining due to obstruction). The core strengthening principle is similar, but the application is tailored to male anatomy and BPH-specific dysfunction.
2. Can these exercises really help with post-void dribbling?
Yes, they are one of the most effective non-invasive treatments for post-void dribbling. Dribbling often occurs because weak pelvic floor muscles cannot “milk” the last drops of urine from the urethra after you finish. Strengthening these muscles improves that final squeeze. Additionally, learning to fully relax them during voiding helps empty more completely, leaving less to dribble out afterward.
3. I feel like I’m doing it wrong. How can I be sure?
This is common. Red flags include: feeling it mostly in your buttocks or thighs, holding your breath, or your lower abdomen bulging out. To check, lie on your back with knees bent. Place a light hand on your lower belly (it should stay soft) and another hand on your inner thigh (it shouldn’t tense). The sensation should be a subtle lifting and drawing in at the very base of your pelvis. If unsure, a single session with a pelvic floor physical therapist for guidance is invaluable.
4. How long should I hold each contraction?
Start with 3-second holds in the first two weeks, focusing on perfect form. You can gradually build to 5-10 second holds over several weeks if you can do so without straining or bearing down. The quality of the contraction and the completeness of the relaxation afterward are more important than the hold time.
5. Will these exercises improve my urine flow or shrink my prostate?
No. Pelvic floor exercises do not change the physical size of your prostate or directly increase flow force by opening the urethra. They work by improving the efficiency and control of the muscles surrounding the urinary system. This can help you empty more completely (reducing residual urine) and control leaks, which indirectly improves your urinary experience.
6. Can I overdo pelvic floor exercises?
Absolutely. Over-training can lead to muscle fatigue, increased pelvic tension, and even pain. This is counterproductive. Stick to the recommended sets and listen to your body. If you feel soreness or increased discomfort, take a day or two off. The mantra is “train, don’t strain.”
7. Should I do these exercises if I have prostatitis or pelvic pain?
Caution is needed. In conditions like chronic prostatitis/chronic pelvic pain syndrome (CPPS), the pelvic floor is often already too tight and spasmic. Traditional strengthening Kegels can worsen pain. In these cases, the focus should be on relaxation, stretching, and down-training the muscles, often under the guidance of a pelvic floor physical therapist. See our guide on Prostatitis vs. BPH for more.
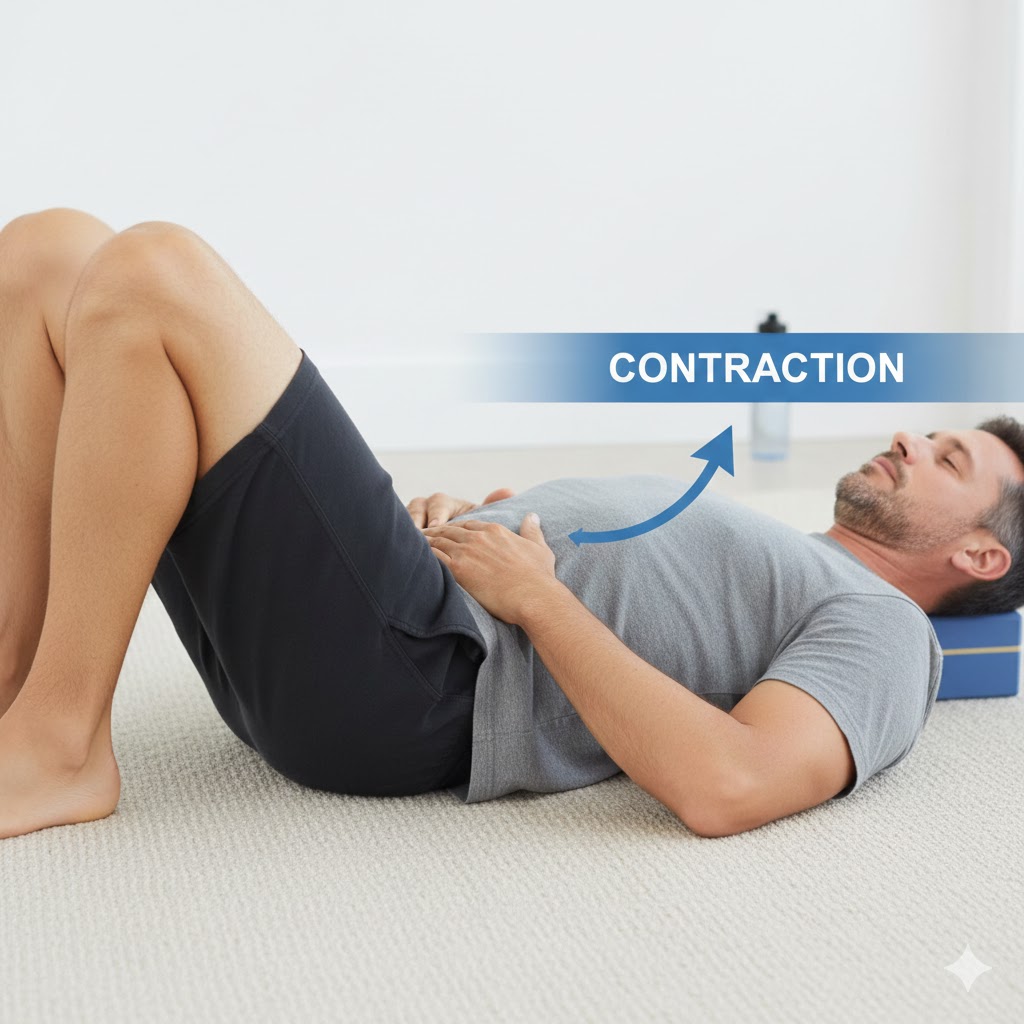
8. What’s the best position to do these exercises in?
Start lying on your back with knees bent, as it’s the easiest position to isolate the muscles without gravity or other muscles assisting. Once mastered, practice sitting and standing, as this is how you’ll need to use them functionally (e.g., to prevent a leak when you cough while standing).
9. Can pelvic floor exercises help with erectile dysfunction (ED) related to BPH?
They can play a supportive role. A strong, coordinated pelvic floor contributes to erectile rigidity and control. However, ED in BPH is often multifactorial (related to blood flow, nerves, medications, psychology). While pelvic floor exercises may help, they are not a standalone cure for ED. They are one piece of a comprehensive approach.
10. When is the best time of day to do them?
Any time you’ll remember consistently. Many men find it easy to link them to an existing habit: while brushing teeth, during morning coffee, or at a red light during their commute. Spread your sets throughout the day rather than doing all at once to avoid fatigue. Avoid doing them while actually urinating.
Related Articles
- Bladder Retraining for BPH: Increase Your Capacity: Combine muscle strength with behavioral training for maximum control.
- Post-Void Dribbling: Why it Happens and 5 Solutions: Apply your new pelvic floor strength to tackle this specific frustration.
- Prostatitis vs. BPH: Key Differences: Important read if you have pelvic pain, as the exercise approach differs.
- BPH Surgery Recovery Diary: The Role of Rehab: See how pelvic floor exercises fit into post-surgical healing.
Your Journey to Better Prostate Health Starts Here
This article is just one part of our complete, 30+ article resource on BPH and prostate health.
From first symptoms to treatment recovery, natural remedies to surgical deep dives—we’ve covered it all in one place.
🗺️ Explore The Complete BPH & Prostate Health HubInside: Symptom Trackers | Treatment Comparisons | Recovery Diaries | Diet Plans | FAQs | and much more.